Sunday, February 11, 2018

Elementary Projects for Valentine's Day

Looking for projects inspired by Valentine's Day?  Check out the lessons I created with K-3!  Some projects were inspired by other lessons I have found over the years, so I tried to share the blog posts from other teachers who inspired my lessons.

Romero Britto Heart Paintings with Kindergarten


Materials: Pencil, Paper, Black Marker, Tempura Cake Paints

Duration: 1-40 minute class period

Directions: Start by sharing pictures of Britto's art with your kindergarteners!  Share how he created designs in each space of his art, such as dots, lines, colors, etc...now's the fun part!  Have your binders practice drawing hearts!  Some may struggle at first, but once they get the loop and points, they'll go crazy with their hearts!  Using pencils, have students create one or more hearts to fill their paper, then draw in lines and shapes.  Once done, use a black marker to trace, then tempura cakes to paint in the spaces!


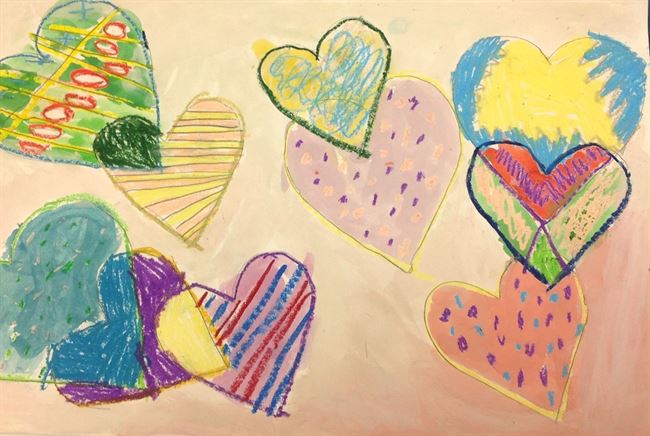
Contour Hearts with 1st Grade

Materials: Heart Templates, Pencils, Paper, Oil Pastels, Tempura Cake Paints

Duration: 2-40 minute class periods

Directions: For Day 1, start by talking about how the hearts can overlap (one in front of the other).  Have the students use heart stencils to trace out about 10 hearts (overlapping to fit them in the paper).  Once traced, have students use oil pastels to trace, color in, or add patterns to each heart.  On day 2, have students finish filling in the hearts with oil pastels and fill in the rest of teh paper with tempura cake paint!


Symmetry Hearts with 2nd Grade

Materials: 9 x 12 colored paper, 12 x 18 colored paper, pencils, scissors, glue

Duration: 1-40 unite class period

Directions: As a one class project, the object is to have students achieve the illusion of symmetry with the heart design.  Using the 9 x 12 paper, draw half of a heart, cut the shape out, then glue the outer piece to the edge of the 12 x 18 paper.  Draw another heart inside of the already-cut heart, cut it out, and glue on the opposite side.  Draw, cut out, and glue down about 3 more heart shapes and you have a finished piece!


Positive/Negative Space Hearts with 3rd Grade

Materials: 9 x 12 colored paper, 12 x 18 colored paper, small baggies, pencils, scissors, glue

Duration: 2-40 minute class periods

Directions: On day 1, talk about positive/negative space in art.  Using the 9 x 12 colored paper, draw and cut out a heart shape.  On each side of the heart, draw and cut out shaped that will be reflected in the finished artwork.  Please Note:  Use the baggies to store the pieces once they are cut out.  This prevents any lost pieces, plus it's 100% easier with clean up.  Once all pieces are cut out, glue down the big heart.  On day 2, show the students how to glue the pieces down to reflect the empty space.  Not all students will finish right away, you will see that it may take the entire time for many students.

This project was also achieved by many other schools and can be found here for 5th grade and here for 6th grade.


Love Paintings (Inspired by Robert Indiana) with 3rd Grade
Image result for robert indiana love

Materials: LOVE Stencils, 10.5 x 10.5 white paper, Pencils, Black Markers, Tempura Paint

Duration: 2-40 minute class periods

Directions: On day 1, we discussed the artwork of Robert Indiana, then folded the white paper to make 4 squares.  We then began tracing stencils to spell out L-O-V-E in each square.  Students then began painting colors in the letters and in the backgrounds.  On Day 2, students finished up on painting.  If they finished on the first day, each letter was traced with marker to cover any loose paint lines.


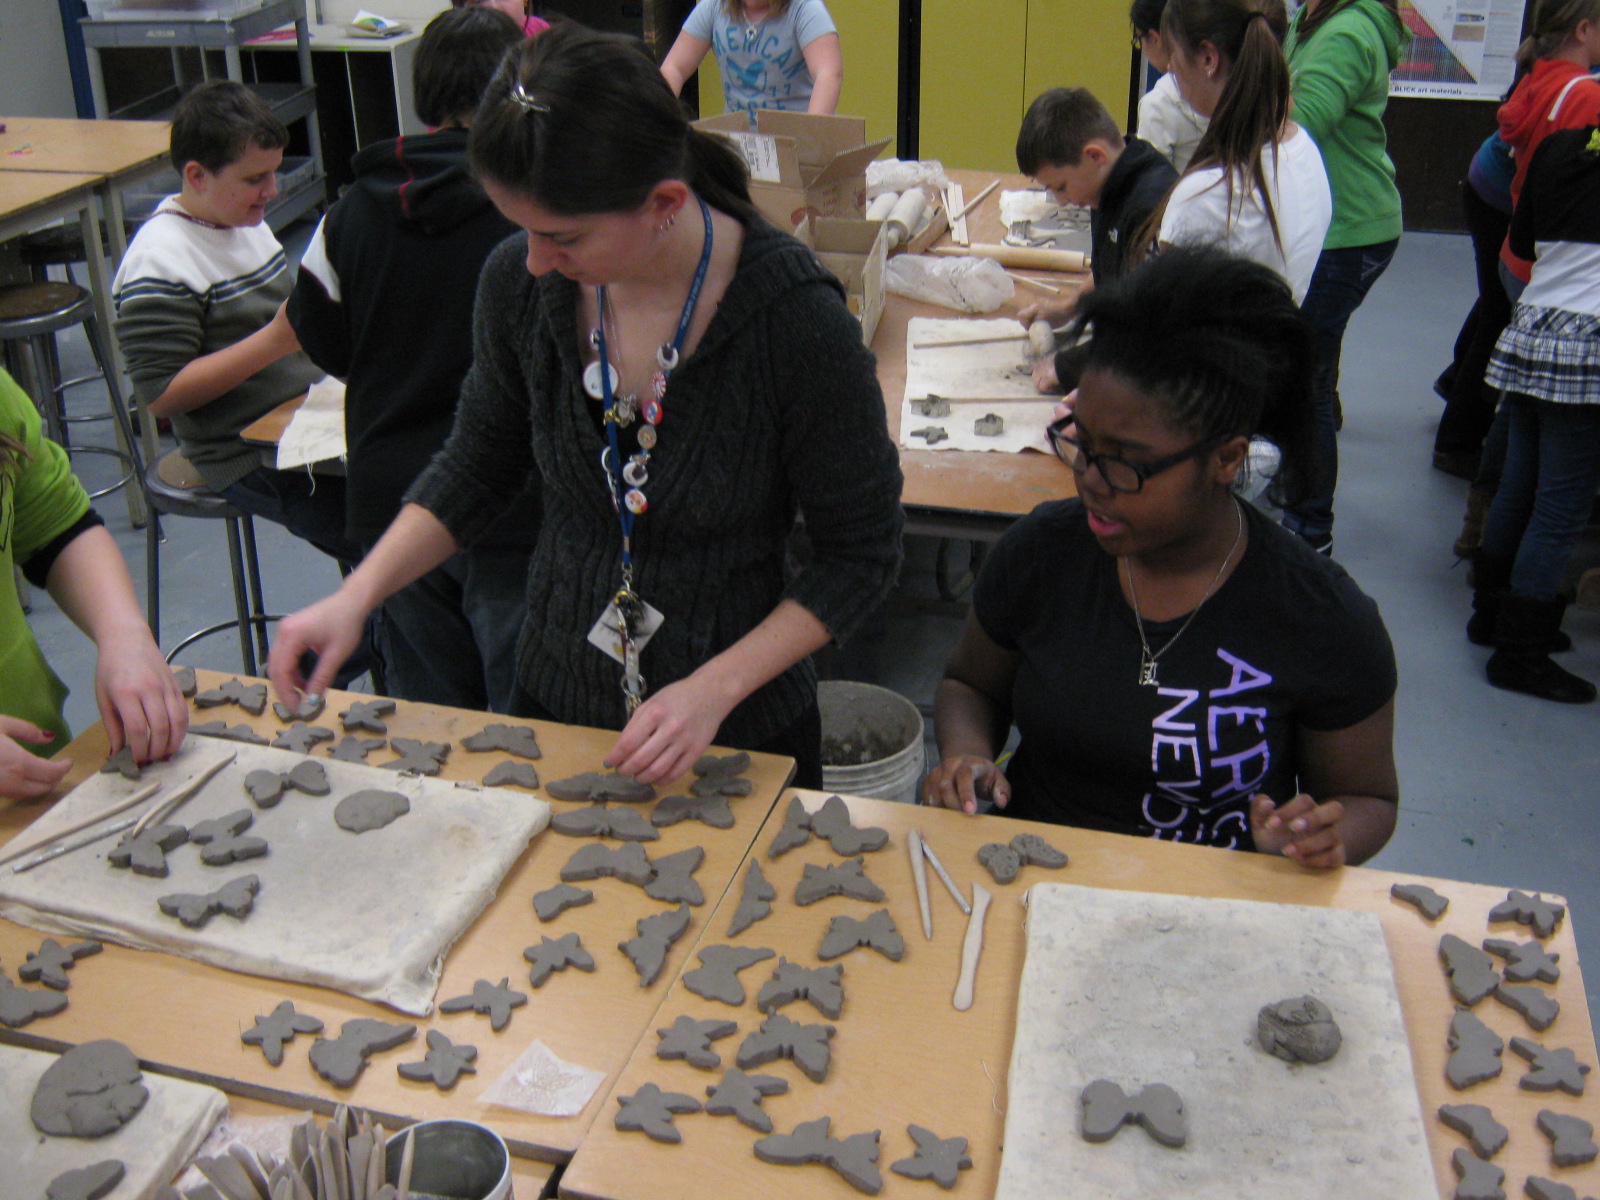
Heart-Shaped Coil Pottery with 3rd Grade

Materials: Ceramic Clay (or air dry clay), Water, Canvas, Desired Paint (Glaze or Acrylic)

Duration: 2 40-minute class periods

Directions: On Day 1, discuss how to create a coil pot using ceramic clay.  Start with rolling a small amount of clay into a ball, flattening it down then rolling coils to wrap around the flat base.  Use the water for the slip process to make the coils stay together once dry.  Once the pot is completed, pinch the top and bottom of the top of the pot to form the heart shape.  On your own, fire the pottery for your next step.  On Day 2, (depending on your resources) paint the pots using either glaze (if kiln is easily accessible) or acrylic paint (if you can't fire again).  


SaveSave

Thursday, February 8, 2018

Artists That Inspire Us: Clay Vessels (Inspired by Ceramic Artist Melissa Monroe)


Meet Melissa Monroe. Melissa is a lifelong Illinoisan, having been raised in Galesburg and now living in the Chicago suburbs with her family. She sells her ceramic art at shows in the Chicago area and at fine stores and works with chefs to create custom dishware for their restaurants.

“When I started working in clay in college it was impossible to predict the places it would take me. It has been fun journey of farm dinners where I provide dishes, the art show circuit in Chicago, and gallery shows. As I have grown in my work I find my creativity divided into two camps: the functional and the sculptural. My functional work has become focused on working directly with customers creating custom plate ware for their homes and businesses. I love to sit down to a day of throwing and trimming all of these commissions and getting the satisfaction of the matching sets of bowls and plates. The second part of my art is the creative sculptural side - making wild abstracted flowers and sculptural vases, bottles and jars. These are the objects of imagination and whimsy. I hope that both of my camps of artwork provide a connection with each person either in daily use or visual connection.”


Melissa is a friend and artist colleague from my home town. I've had the joy of working with her for our local artist guild and is this year's featured artist for our Illinois Art Education Association's Mosaic Magazine. Melissa is an artist that inspires me, so I decided to share her work with my 4th grade students.


The Project


Inspired by Melissa’s style of ceramics, students will create their own clay vessel displaying a face. This will be done by using the slab technique for ceramics.


Materials

Ceramic Clay, Water, Glaze, Canvas, Clay Tools, Rolling Pins


Directions
This project will take about three 40 minute classes for creating and glazing, and one 40 minute class for assessment and artist statements.

Day 1: Introduction and vessel design. Students are shown a slideshow featuring the artist Melissa Monroe, as well as the artworks she created. After a group discussion about her style of work, the teacher demonstrates how to create a vessel using the slab technique. Students are given a portion of clay and instructed to take ¼ of the portion to roll into a ball and press down to make the base. With the remaining clay, students use a rolling pin to roll the clay out to a slab that’s ¼” thick. Next they are to draw a long rectangle in the slab, cut the remaining clay away, and wrap the slab around the base. Once the slab was wrapped, students marked the bottom of their vessels with their initials and wrapped their projects for the following week.

Day 2: Details and finishing touches. Prior to students receiving their projects to finish, they are shown how to attach facial expressions using the slip/score process. Similar to Melissa’s designs, students add eyes, nose, mouth, eyebrows, and any designs that show expression. Once completed, students handed in their projects to dry over the week. A week or two is needed between days 2-3 for clay to dry and fire in the kiln.


Day 3: After clay is fired, students are shown how to apply glaze to their pieces. Projects will go through a second firing


Day 4: Chromebooks needed to visit Artsonia to write artist statements (or create your own method of writing artist statements with students)

Here are the finished art pieces!  The lesson plan with standards will be available in this year's printed Mosaic Magazine for IAEA members.


Art Teacher Blogs

This post is a part of The Art Ed Blogger's Network: Monthly Tips and Inspiration from Art Teacher Blogs. On the first Tuesday each month, each of these art teacher blogs will post their best ideas on the same topic.

Participating Art Teacher Blogs:

Courage with Clay: February's Stepping Stones


One of the trickiest materials to work with while traveling or working without a room is clay.  Clay materials can take up a bit of space, but it’s one of the most entertaining projects that students become engaged in.  No matter if it’s play dough or ceramic clay, students love to sculpt and mold!  Clay projects can be created in any space you work in.  From the start, it may appear to overwhelm you, but if you plan accordingly, clay projects can be one of your most successful lessons of the school year.


Start with knowing your space.  Do you have a classroom all year round?  You can provide space in your room to work and store materials.  Do you have a kiln in your school?  Even better!  Is there a kiln in the district, but not in your room?  Consider creating clay projects that can handle traveling to another school to be fired.  Do you travel?  Investigate where you can store materials either before the clay is used or while the projects are drying.


Figure out with clay works best.  If you have a kiln in your school or district, you have the ability to use ceramic clay that can be fired and glazed.  If not, consider ordering air-dry clay, which can help in giving your students a similar experience with molding the material.  Even with traveling from room to room, you can manage providing clay lessons for your students.  The key to teaching clay from a cart is to communicate with your co-workers on how to manage the clay with a shared space.


Communicate with other teachers involved.  If you move a cart from room to room, inform your co-workers about your intent to use clay materials.  Your co-worker may have space to help store projects during the week, such as the top of shelves or closets.  When you communicate with the teacher, both of you can collaborate to help students have the experience of working with the materials.  In the past, when I traveled from room to room, I would keep the air-dry clay in a box behind the teacher’s desk in the morning, which made it easier for me to travel without moving around a heavy box.


Research how to disperse the clay.  Since I currently have a room, I find it easier to use the clay cutter to disperse the clay.  When I was traveling, I would split the clay in advance and place it in boxes in the teacher’s classrooms until I visited for my art time.  Managing your clay materials will make it easier for you no matter what situation you teach in.


Protect the table tops.  Whether your classroom tables or students’ desks, figure out how to cover your table space.  I use 12” x 12”canvas clothes for our clay projects, but when I traveled, I needed to use gallon size ziploc bags to protect student desks.  During clean up, it’s always good to have a cleaner recommended by the school district.  Art time in elementary can be limited, but with the mess that clay can make, leave extra time for cleaning the tables.


There are other clay materials that work.  In our district, we introduce ceramic or air-dry clay in 3rd grade and create a clay-based project each year until 8th grade.  For my early elementary grade levels, I still use Crayola model magic for some of the student projects. Our intent is to have the early elementary develop an understanding of form; how 2-dimensional shapes can be made into a 3-dimensional form.  We also want students to learn how to create basic forms before using more advanced clay materials, like ceramic clays.


It’s okay to use Playdough.  At the kindergarten level, I introduce using playdough and the students love it!  It helps them become familiar with clay materials, plus they giggle and laugh with everything they make!  There are simple clay tools that help with fine motor development, such as rollers, scissors, and press molds for rolling, pressing, cutting, and molding.  At the end of the class, the clay can be put away for another class to use.  


Plan how you’ll design and finish the pieces. If you have the materials and space provided, take it the next step!  If you have a kiln, there are plenty of glazes available to use to decorate your fired clay projects!  If you do not have access to a kiln, consider having students use acrylic paints to finish their projects.  Acrylic leaves a bright color coating, plus you can add a clear coat to protect the paint.  

No matter what space you have or what your teaching situation is, you can always make room for clay projects!  Have courage and plan time to get creative with clay!